Creating Your Own US Netflix Proxy with Google Cloud
Say you wanted to create your own Unblock-Us or Tunlr service… maybe for educational purposes or maybe because Netflix is starting to block access from VPN providers used by people for region-restriction bypass. Either way, with cloud computing it’s easy and fairly cheap.
The following setup you can accomplish it on your favorite cloud provider. In my case: Google Cloud’s GCE.
GCE does come with a trial (60 days/$300 USD), and you can set that up here: https://console.cloud.google.com/compute/
First thing you wanna do is create a new VM instance:
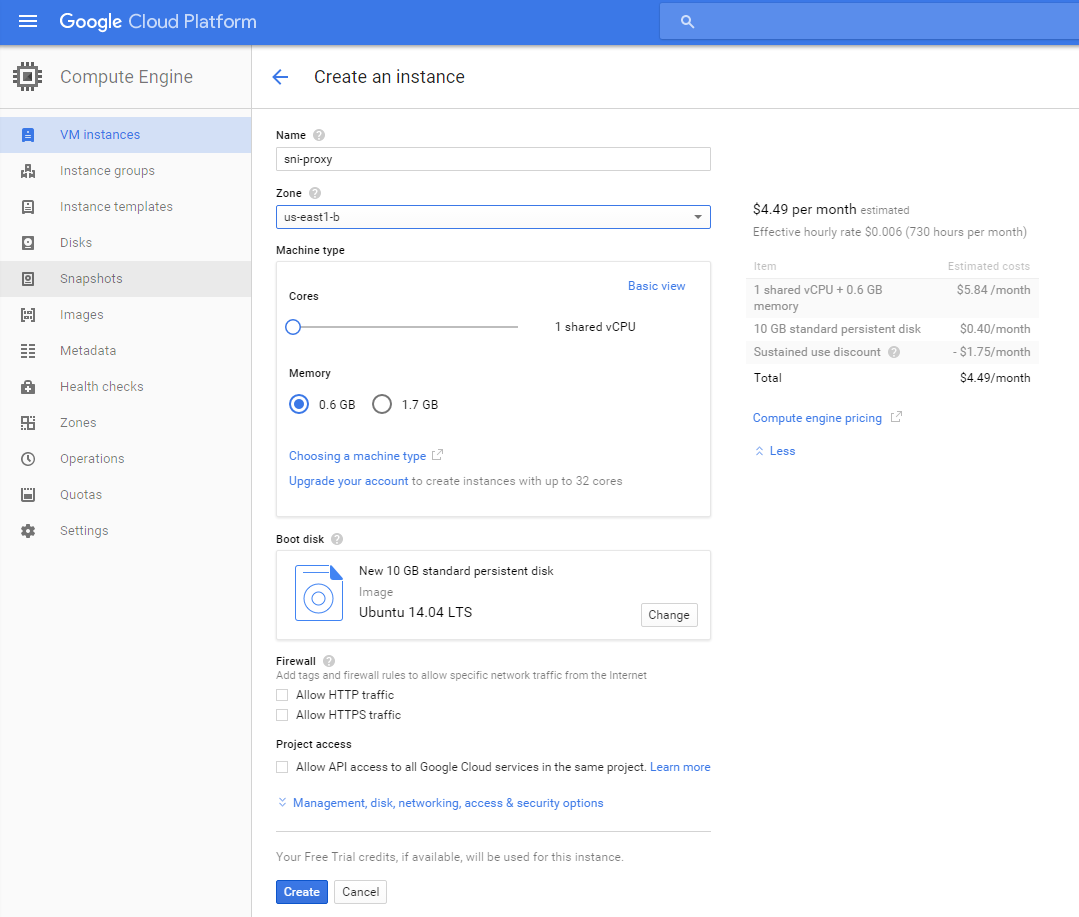
Select Ubuntu 14.04 LTS as the image with 10gb of space. There’s no need for more than 0.6gb of ram and 1 shared vCPU.
The zone should be whatever US location is closest you: us-east*
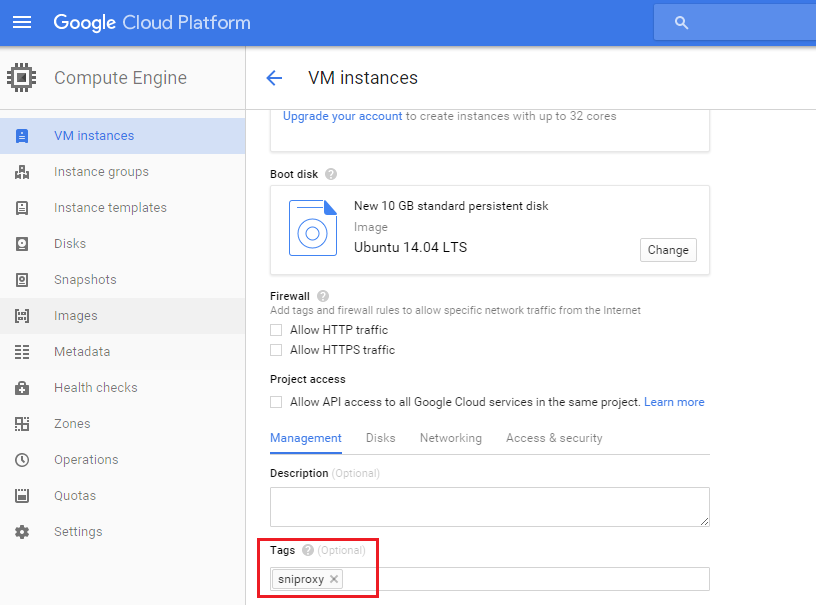
At this point, we have to configure some VM settings so click the Management, disk, networking, access & security options to expand advanced settings.
Under the Management tab, create a unique tag (sniproxy):
Under the Networking tab, select New static IP address to create a new External IP. Give the reserved static IP a name for reference and click Reserve. Make a note of the IP as we’ll need it in the setup later on:

At this point, you can add users and SSH keys to the Access & security tab if you need to but the defaults should be sufficient.
Go ahead and create the instance. It’ll take a couple of minutes, but it should popup under your VM Instances when it’s ready.
Before we do anything else, it’s important to lock down the instance since it is facing the internet. The new instance was added to the default network (find this under Google Cloud Networking -> Networks).
Navigate to the default network configuration and create a new firewall rule. The important thing here is the IP range should be your external IP address (get it here: http://myip.dnsomatic.com/) followed by a /32. You also have to make sure that the target tags is set to the tag you gave the VM (sniproxy).
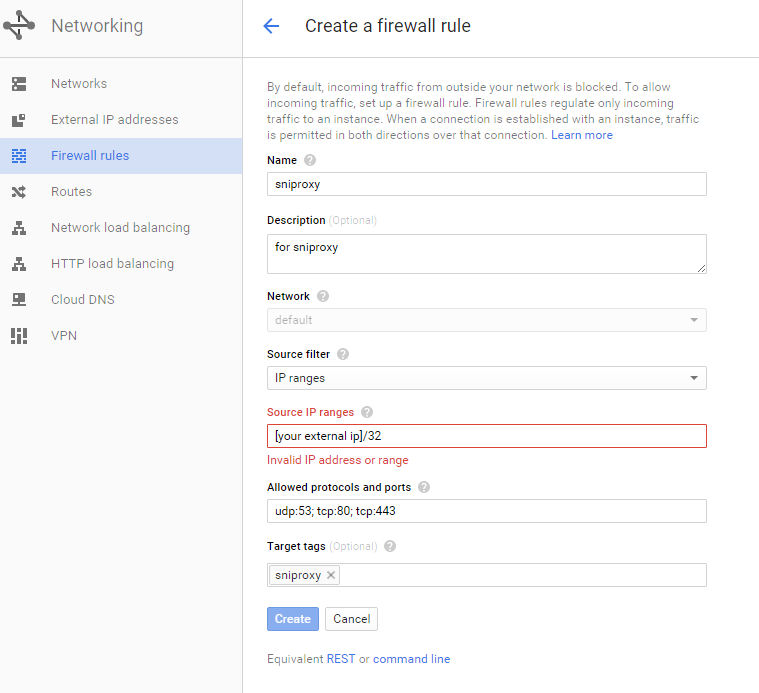
This rule allows only you to use the Netflix proxy, preventing abuse. You will have to modify this value if your IP changes from time to time. It’s a bit of an inconvenience, but very important.
Do not leave these ports open for anyone to access. Bad guys could use your services to launch DDoS attacks (see Open Resolver Project), or consume resources and balloon your monthly bills.
You can lock down further with IPtables if you wish, but this would become tedious to update if your IP changes frequently.
Go back to Compute Engine and find the VM instance. There will be an SSH connection option (awesome):

You should now be connected to the shell and ready to begin setup:
$ sudo su -
# apt-get update
# apt-get install dpkg-dev cdbs debhelper dh-autoreconf libev-dev libpcre3-dev pkg-config libudns-dev git
# apt-get install bind9 vim
# cd ~
# git clone http://github.com/dlundquist/sniproxy.git
# cd sniproxy && dpkg-buildpackage
# dpkg -i ~/sniproxy_0.4.0_amd64.deb
Configure sni-proxy:
# echo ENABLED=1 > /etc/default/sniproxy
# cat /etc/sniproxy.conf
user daemon
pidfile /var/tmp/sniproxy.pid
listener 0.0.0.0 80 {
	proto http
	access_log {
		filename /var/log/sniproxy/http_access.log
		priority notice
	}
}
listener 0.0.0.0 443 {
	proto tls
	access_log {
		filename /var/log/sniproxy/https_access.log
		priority notice
	}
}
table {
	(hulu|huluim)\.com *
	netflix\.com *
	ip2location\.com *
}
error_log {
	filename /var/log/sniproxy/sniproxy_error.log
	priority notice
}
# service sniproxy start
# update-rc.d sniproxy defaults
Configure bind9 and make sure the various named.conf.* and *.override files look like mine below.
# mkdir /var/log/named && chown bind /var/log/named && chgrp bind /var/log/named
Pay attention to the allow-query and allow-recursion values. If you did not restrict access via the GCE firewall rules, you must create a bind ACL with your external IP as the only one allowed to query.
It’s a good idea to do both bind ACL and firewall ACL.
# cat /etc/bind/named.conf.options
options {
	directory "/var/cache/bind";
	dnssec-validation no;
	auth-nxdomain no; # conform to RFC1035
	listen-on-v6 { any; };
	forwarders {
		8.8.8.8;
		8.8.4.4;
	};
	allow-query { any; }; # create an ACL if you did not firewall port udp/53 tcp/53
	allow-recursion { any; }; # create an ACL if you did not firewall port udp/53 tcp/53
	recursion yes;
	dnssec-enable no;
};
# cat /etc/bind/named.conf.local
include "/etc/bind/rndc.key";
include "/etc/bind/zones.override";
logging {
	channel bind_log {
		file "/var/log/named/named.log" versions 5 size 30m;
		severity info;
		print-time yes;
		print-severity yes;
		print-category yes;
	};
	category default { bind_log; };
	category queries { bind_log; };
};
# cat /etc/bind/zones.override
zone "hulu.com." {
	type master;
	file "/etc/bind/db.override";
};
zone "huluim.com." {
	type master;
	file "/etc/bind/db.override";
};
zone "netflix.com." {
	type master;
	file "/etc/bind/db.override";
};
zone "link.theplatform.com." {
	type master;
	file "/etc/bind/db.override";
};
zone "ip2location.com." {
	type master;
	file "/etc/bind/db.override";
};
In the db.override file replace VM-EXTERNAL-IP-ADDRESS with your VM’s static external IP address:
# cat /etc/bind/db.override
; BIND data file for overridden IPs
;
$TTL 86400
@ IN SOA ns1 root (
        2012100401 ; serial
        604800 ; refresh 1w
        86400 ; retry 1d
        2419200 ; expiry 4w
        86400 ; minimum TTL 1d
        )
; need at least a nameserver
@ IN NS ns1
; specify nameserver IP address
ns1 IN A VM-EXTERNAL-IP-ADDRESS ;external IP created for the VM
; provide IP address for domain itself
@ IN A VM-EXTERNAL-IP-ADDRESS ;external IP created for the VM
; resolve everything with the same IP address as ns1
* IN A VM-EXTERNAL-IP-ADDRESS ;external IP created for the VM
Start the bind9 service:
# service bind9 start
# update-rc.d bind9 defaults
To further lock down the box, a sample iptables configuration file (replace HOME-EXTERNAL-IP with your IP address):
# iptables-save
*raw
:PREROUTING ACCEPT [50228:66528501]
:OUTPUT ACCEPT [19020:1901406]
COMMIT

*nat
:PREROUTING ACCEPT [93:6171]
:POSTROUTING ACCEPT [62:4250]
:OUTPUT ACCEPT [62:4250]
COMMIT

*filter
:INPUT DROP [62:3607]
:FORWARD ACCEPT [0:0]
:OUTPUT ACCEPT [1060:163175]
-A INPUT -s HOME-EXTERNAL-IP/32 -p udp -m udp --dport 53 -j ACCEPT
-A INPUT -s HOME-EXTERNAL-IP/32 -p tcp -m tcp --dport 443 -j ACCEPT
-A INPUT -s HOME-EXTERNAL-IP/32 -p tcp -m tcp --dport 80 -j ACCEPT
-A INPUT -s HOME-EXTERNAL-IP/32 -p tcp -m tcp --dport 22 -j ACCEPT
-A INPUT -m conntrack --ctstate RELATED,ESTABLISHED -j ACCEPT
-A INPUT -m state --state RELATED,ESTABLISHED -j ACCEPT
COMMIT

*mangle
:PREROUTING ACCEPT [50228:66528501]
:INPUT ACCEPT [50228:66528501]
:FORWARD ACCEPT [0:0]
:OUTPUT ACCEPT [19021:1902054]
:POSTROUTING ACCEPT [19021:1902054]
COMMIT
That’s it.
You can now set the DNS servers on your device (Nexus Player, Laptop, etc) to the VM’s external IP address. You only need to set one DNS server, leave the other blank or the proxy may not work as intended.
To do a quick test, all of the following dig commands should return an A record pointing to your VM’s external IP address:
# dig @localhost netflix.com
# dig @vm-ip netflix.com
Timeouts for the localhost command could mean a bind9 configuration problem. Timeouts to the vm-ip (while localhost succeeds) could indicate a network/firewall issue.
If something isn’t working, troubleshoot the following log files:
# tailf /var/log/named/named.log
# tailf /var/log/sniproxy/sniproxy_error.log (or http_access.log/https_access.log)
If you don’t see any activity in the bind9/sniproxy app logs, it could be a networking issue. Make sure the firewall rules are properly tagged (the target tags contain your VM instance tag).
You can use netcat or tcpdump to troubleshoot network/firewall problems.
Shout out to NakedCleaner for the Azure version of this setup and to dlundquist for sni-proxy!